Learn how to design a crocheted blanket in this free tutorial. I had originally planned to create an online course on Udemy for this project, but as some of you may know, my husband has not been well. I didn’t have the time or energy to create new content this week, so I decided to use this project for this week’s post. There is quite a lot of information here, and it does require a fair bit of math. I have created calculations for you to follow, and hopefully, this will make it easier for you to create your own designs. I have also created a YouTube tutorial that will go into more detail than what I will write about here.
The instructions for designing your own blanket are for patterns that are in rows, and not in rounds like granny square patterns. Therefore, you can use any stitch pattern you like that works in rows, and then adapt that pattern for your blanket. You can also combine stitch patterns to create a very unique design. I will talk about that later, but I do refer to this at the bottom of each calculation sample I give here. To begin, however, I would recommend that you start with a very basic stitch design. You can find all sorts of stitch patterns on YouTube and also in books like the Crochet Stitch Dictionary, by Sarah Hazel.
How to design a crocheted blanket begins with creating a test swatch. This will give you all the information you need to figure out how many pattern repeats you need, how many stitches you need for your foundation chain, how many rows are required, and how much yarn is required for your project. It can also show you what the pattern looks like, how the yarn color looks, and whether you like it or not. You can use any yarn you like and use the recommended crochet hook for that yarn, or a different size if you desire.
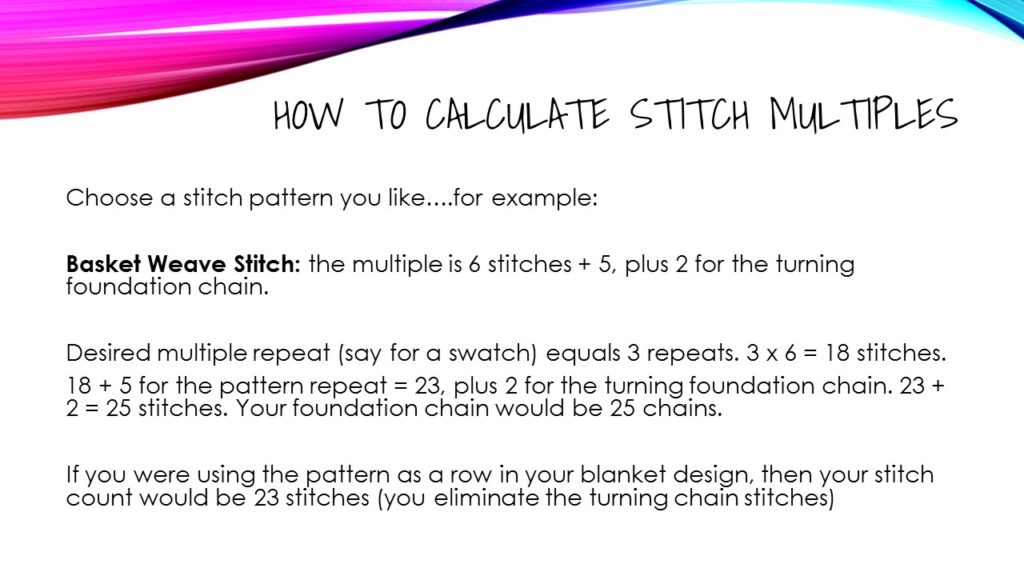
All stitch patterns will be in multiples. This means there are a certain number of stitches for the stitch pattern itself, plus extra stitches to accommodate off-setting the stitch pattern if needed, and then extra stitches for the turning chain. You need to use this information to calculate how many chains you need for your foundation chain and how many pattern repeats you need to make your blanket the width you desire.
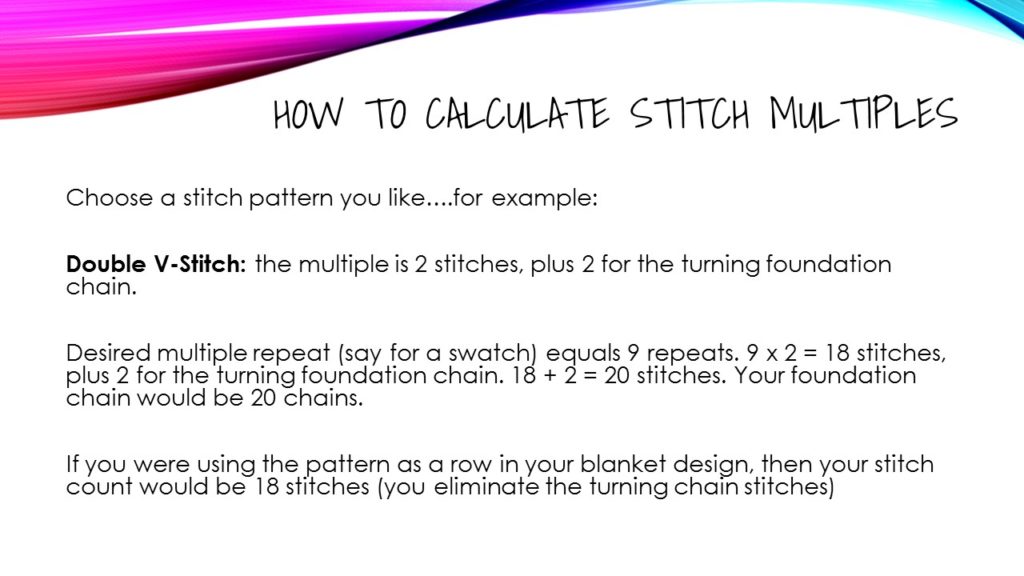
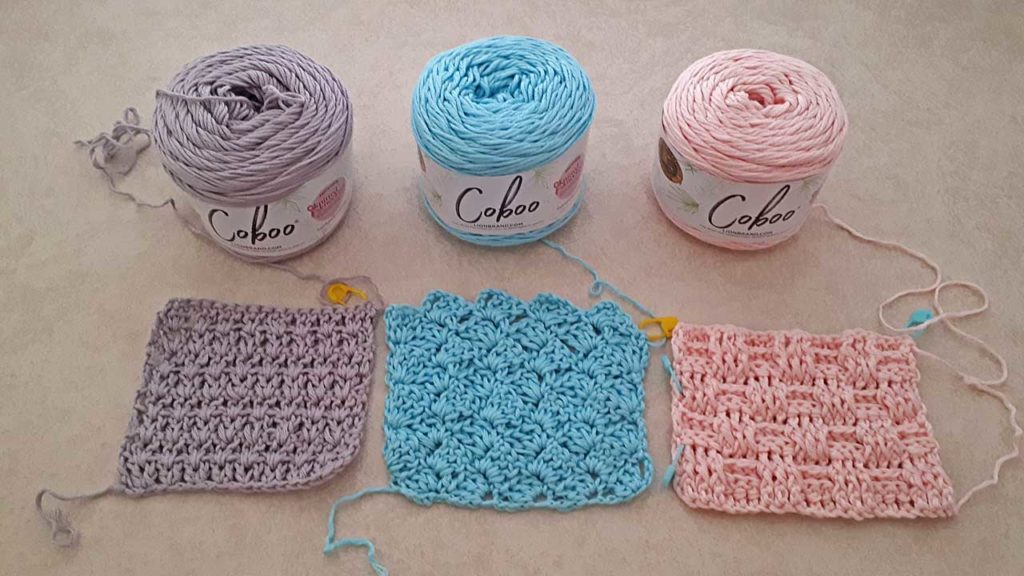
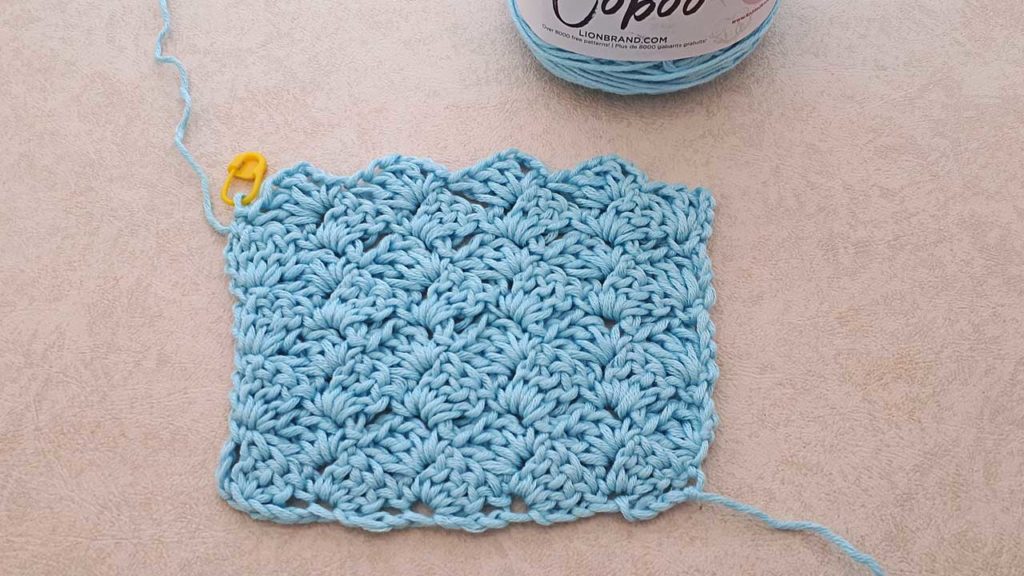
I have three different stitch patterns here for a test swatch and I have the calculations for each one so you can see how this works. The industry standard for a test swatch is 4″ by 4″ or 10 cm by 10 cm, but you can make your swatch any size you like. In this example, the Double V-Stitch has a multiple of 2 stitches (the pattern), plus 2 chains for the turning foundation chain.
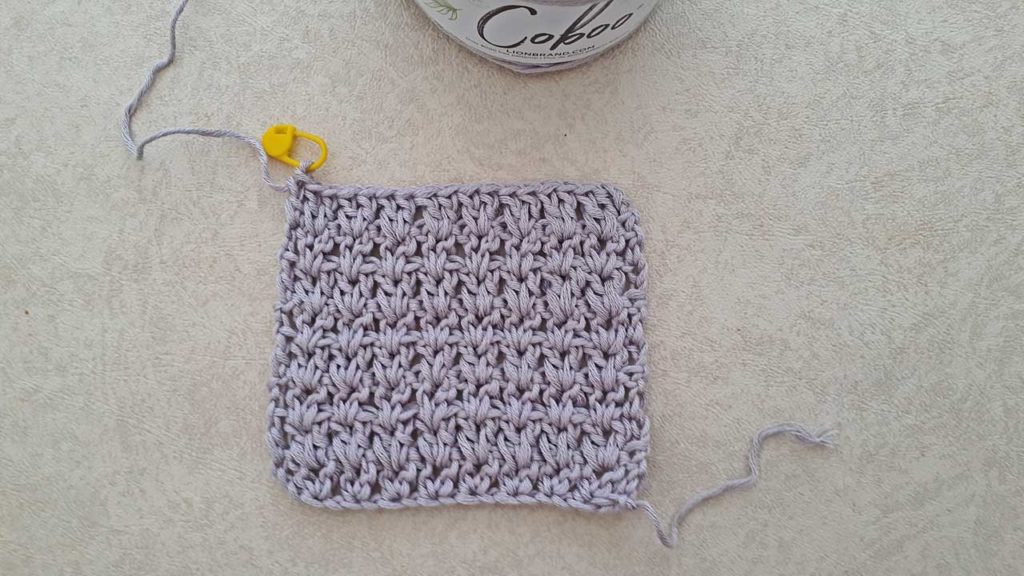
The next example is the Tulip Stitch. This stitch pattern has a multiple of 4 stitches (the pattern), plus 5 stitches for the turning foundation chain. You can see the calculations and the swatch sample below.

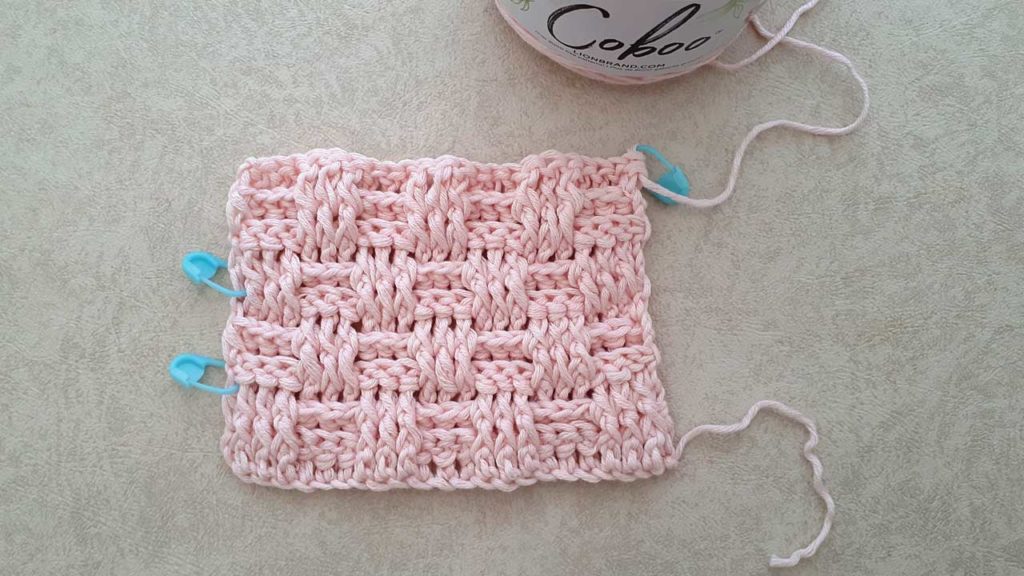
The next example is the Basket Weave Stitch. This pattern requires the stitch pattern to be offset for the design to work out. Therefore, this multiple is 6 stitches (the pattern), plus 5 stitches (to accommodate the pattern design), plus 2 stitches for the turning foundation chain. You can see the calculation and the swatch sample below.
Once you have created a sample swatch, then you can decide what size blanket you want to make and then move on to the next set of calculations.
You can make a blanket any size you like, but you can see some of the recommended sizes in the chart above. For the samples I will show you, I am using a blanket size of 30″ by 36″. I’m only going to offer imperial measurements here. If you want the metric sizes, then a basic calculation is that 1″ equals 2.5 cm.
The image above shows the calculations required for this next step, and I will provide examples for each pattern in the images below.
Once you have the calculation for the foundation chain, you can actually begin your blanket pattern. You can simply crochet the pattern design until you have the blanket to the height that you desire. If, however, you want to know how many rows are required, then you can follow the calculations below, to see how that is done.
Tip: A common problem when designing any project like this is that tension of the foundation chain can be too tight and the blanket will pull in at the bottom. A good way to remedy this is to do your foundation chain using a crochet hook that is a half to one size larger than what you are using for the pattern. Make sure to switch back after you’ve created the foundation chain! The other option is to crochet the foundation chain with a very loose tension…much looser than your normal tension.
The last calculation is how to figure out how much yarn is required for the size of blanket you are making. This is where you go back to your sample swatch. I will just give one example here, using the Tulip Stitch Swatch. It does mean that you have to unravel your swatch, so make sure you have all your other calculations done before this next step.
Now, that is most of the calculations required to figure out how to design your own crocheted blanket, but there are a couple of other considerations to take into account. The first is whether you want to add a border to your blanket or not. If you want to add a border, then you want to do a round of single crochet all the way around the blanket as a foundation stitch for your border design. I am not going to teach how to do borders in this tutorial, but I do cover this a bit more in the video tutorial. I’m a big fan of simple borders of single crochet, half double crochets, and double crochets.
If you don’t want to do a border, then I recommend that you begin and finish your blanket design with a row of single crochet. This will affect the number of stitches required for the foundation chain, but not to worry…it is quite simple. Follow the direction above to calculate the number of stitches required for the foundation chain, but rather than using the number of recommended stitches for the turning chain in the pattern design, just add one chain for your beginning row of single crochet. You may want to use the larger crochet hook for this row of single crochet as well to prevent the bottom of the blanket from tapering in. Then follow the pattern design as directed (with the exclusion of the turning chains).
If you feel confident in how to design a crocheted blanket using one stitch design, then you can create a blanket using multiple stitch designs. In this case, you would want to make sure that all your stitch designs have multiples that divide equally into each other (again I discuss this more in the video tutorial). For example, you could use a fan stitch with a multiple of 8 stitches, then you could use a V-stitch with a multiple of 4 stitches, then you could do {1 dc, ch 1, sk st}, which is a multiple of 2, and of course, any stitch pattern that is a multiple of 1. This can be a lot of fun and you can create a swatch by playing around with some different stitch patterns.
Just one more thing! If you choose a stitch design that has an uneven shape at the top like the Tulip Stitch, then you will need to even out this edge for the last row. In this case, there is no exact pattern, you will have to figure that out for yourself. For the Tulip Stitch, I did a ch 4 to get the row to the height required. I then did 1 sc, twice, 1 dc, and 1 hdc in each stitch. This worked out perfectly.
I hope you enjoyed this tutorial on how to design a crocheted blanket, and if you do and find it of value, you can make a donation here if you like. As I said at the beginning of this blog, I had planned to make this into a course on Udemy (where I have a Boho Poncho Course). Thank you in advance if you do make a donation. Check out the video tutorial below for more detailed instructions!
Some of my favorite things!
Some (but perhaps not all) of the links in this blog are affiliate links to Amazon.com. As an Amazon Associate, I earn from qualifying purchases. This page contains some affiliate links. Please see my policy page for details. I look for the best possible option for your convenience, however, I encourage you to support your local shops!