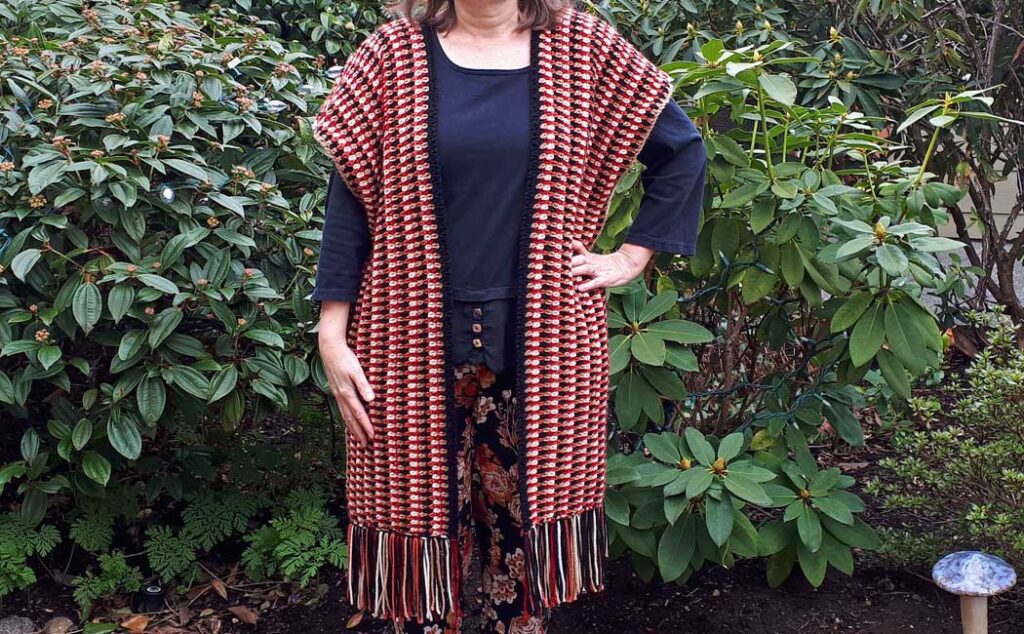
This pattern for my Easy Crocheted Sweater Vest is, indeed a very easy pattern! But while it is an easy pattern, there are several steps involved. So I have divided this project into two parts. This is part one and will involve calculating your custom size, the stitch pattern itself, creating the panels for the garment, and preparing the panels to be sewn together. In part two of my Easy Crocheted Sweater Vest, we will sew the garment together, crochet a border around the front panels and collar and finish with tassels around the bottom of the sweater.
The stitch pattern is simply a single crochet and chain one repeat, so it is super easy to make! If you are new to crocheting, then you can check out my Beginner Crochet Series to learn all the stitches and techniques you will need to make this sweater vest.
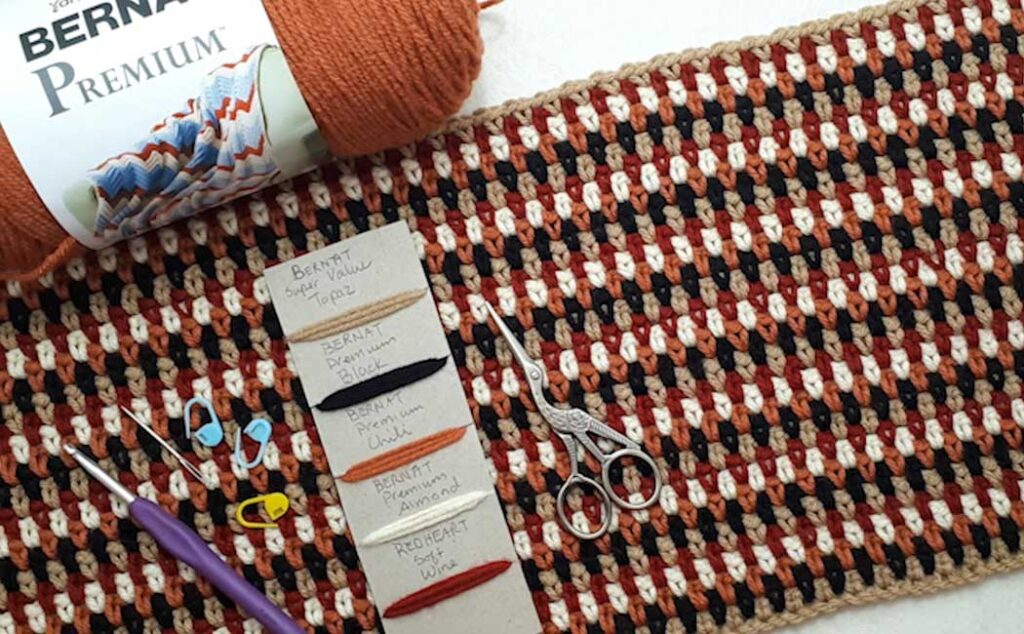
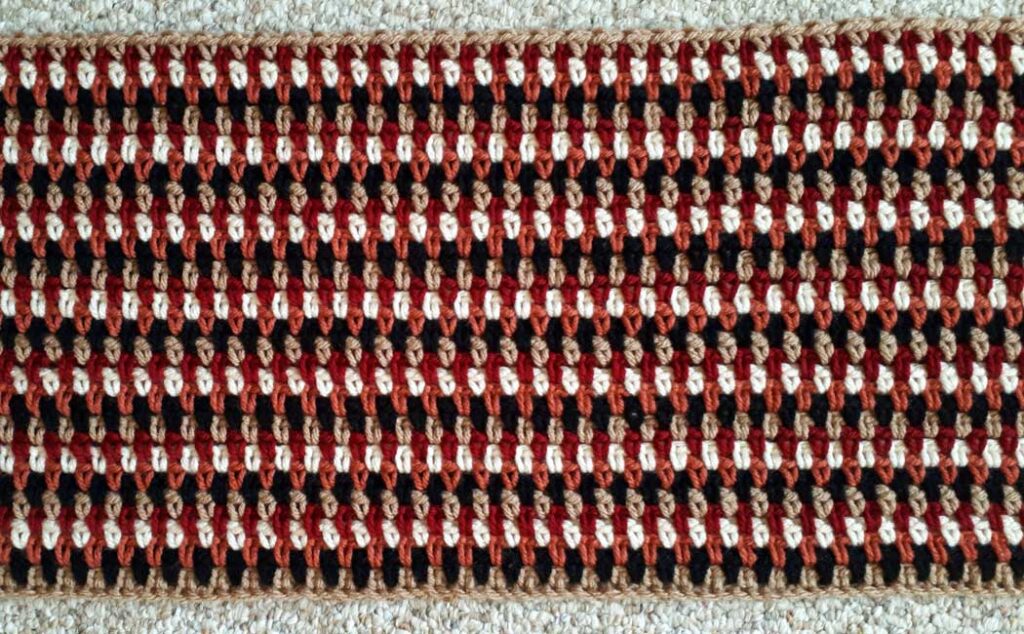
I am using five different colors in my design, and that is what really makes the fabric look so fabulous, but you can use any number of yarn colors you like! I am also using a number four, medium-weight acrylic yarn, but again, you can use any weight or fiber you like. You will be making three rectangle shape panels for this garment, and these panels can be made to any size you like. You can even use a different stitch pattern if you like…be playful and creative!
The instructions for this pattern are for a small-medium size, so the supply list will reflect that. I will show you how to figure out your sizing below, so you will have to modify the amount of yarn required.
Supply List
- Number 4 medium-weight yarn (roughly)
- Body: 1125 yards or 1030 meters
- Trim: 30 yards or 28 meters (of accent color)
- Tassels: 30 yards or 28 meters (of accent color) and 30 yards or 28 meters (of assorted colors)
- Yarns and colors I used:
- Bernat Super Value in Topaz: 233 yards or 213 meters
- Bernat Premium in Black: 285 yards or 261 meters (my accent color)
- Bernat Premium in Chili: 233 yards or 213 meters
- Bernat Premium in Almond: 233 yards or 213 meters
- Redheart Soft in Wine: 233 yards, or 213 meters
- Crochet hook: 5mm or H-8 US
- Stitch markers
- Darning needle
- Scissors
- Cloth tape measure
- Hand Steamer
Some (but perhaps not all) of the links in this blog are affiliate links to Amazon.com. As an Amazon Associate, I earn from qualifying purchases. This page contains some affiliate links. Please see my policy page for details. I look for the best possible option for your convenience, however, I encourage you to support your local shops!
Gauge for medium-weight yarn
- 4 inches (10 cm) high = 13 rows
- 4 inches (10 cm) wide = 15 stitches
Finished panel sized for small-medium size
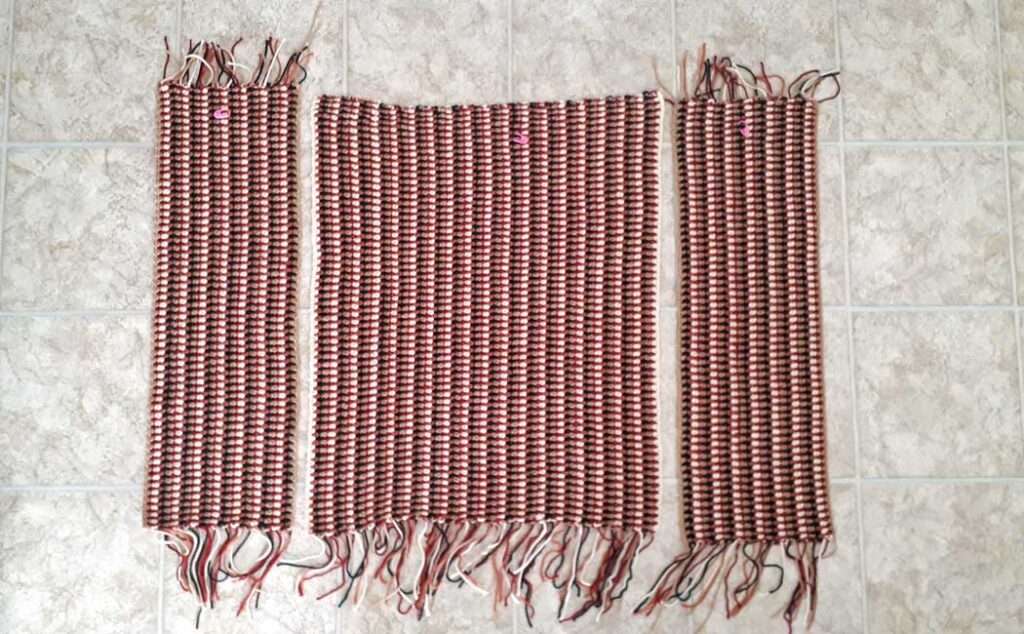
- Front panels (make 2): 10 inches (28 cm) wide by 32 inches (82 cm) long
- Back panel (make 1): 24 inches (61 cm) wide by 32 inches (82 cm) long
Custom sizing
To calculate the perfect size for the Easy Crocheted Sweater Vest, you want to begin by measuring around the widest part of your body. For some, this may be the hips, the mid-section, or the bust. This pattern is made to fit a 44-inch hip size. Using the diagram shown, the front panels are 10 inches each and the back panel is 24 inches, making the whole garment 44 inches all the way around. There will be another couple of inches added once the border around the front is added at the end. This makes for a nice, loose, and comfortable fit.
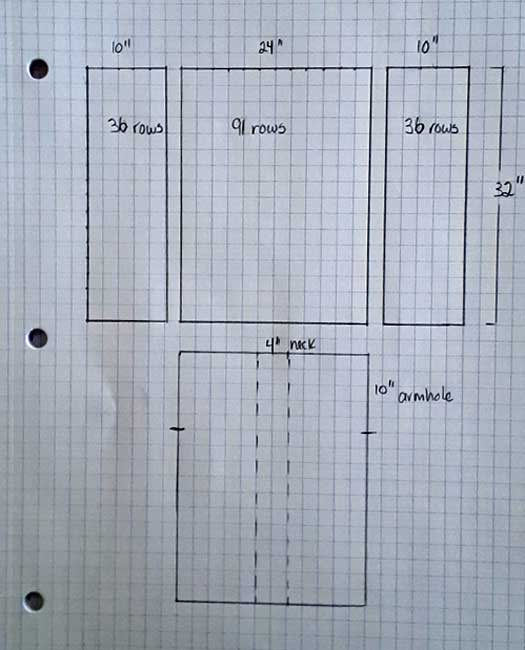
Using this size as a baseline, either add or subtract the difference of your own measurement. So, if for example, your hip size is 40 inches, subtract that from 44 inches. Reduce the pattern by 4 inches, taking 1 inch off each of the front panels and 2 inches off the back panel. Do the same for larger sizes, by adding the difference. If you have an odd number (say 3 inches), divide that by 4 and then add or subtract 0.75 inches for each front panel and add or subtract 1.5 inches for the back panel. To convert these imperial measurements to metric, simply multiply by 2.5 or use an online converter.
The Pattern
Note: if you are using more than one color and want to create tassels on the bottom of the vest, decide what will be the bottom of the garment and leave an extra long tails on this side only. Leave regular-size tails on the shoulder seams.
Foundation chain: ch 117 (or odd number of chains to equal the desired length), ch 3 for turning ch. Note: use loose tension for the foundation chain only, if you are not proficient with managing tension, then use a crochet hook half a size larger. Return to the regular-size hook for the rest of the pattern.
Row one: 1 sc in the back bump of the 4th ch from the loop on your hook, ch 1, sk st, *1 sc, ch 1 in next st, sk st. Repeat from * to the end of the chain, 1 sc in beg ch 3 sp. (117 stitches or number of beginning odd chains)
Row two: new color, ch 2, turn your work, 1 sc, ch 1 in first ch1 sp, sk st, *1 sc, ch 1 in next ch1 sp, sk st. Repeat from * to the end of the row, 1 sc in beg ch2 sp.
Note: to add a new color, leave the last sc of the row on your hook halfway completed (2 loops on your hook), cut the tail end, and bring the new color in to complete the last sc, then ch 2 and turn your work. See the video at 14:25 to see how this is done.
Row three onward: repeat row two, changing colors for each row as desired.
The color sequence and the number of rows for the Easy Crocheted Sweater Vest are:
- Front panels: 36 rows in tan, black, chili, almond, and wine. Repeat this color sequence, finishing with row 36 in tan. Whatever number of rows you end up crocheting, finish the last row in the color before the color you are using for your accent color for the trim and tassels. I wanted to use black, so that is why my last row is finished in tan.
- Back panel: 91 rows in almond, wine, tan, black, and chili. Repeat this color sequence, finishing row 91 in almond.
Once you have crocheted all three panels, tie pairs of the tail ends into square knots on both ends of the panels. As you tie these knots, you will notice that the knots naturally fall to one side of the fabric. Consider this the ‘wrong side’ or ‘inside’ of the fabric and place a stitch marker on this side. This will work for the back panel and only one of the front panels, because the other front panel will be flipped to mirror the other. See the video at 23:20 for more clear instructions on this.
Darn in the tail ends into the wrong side of the fabric, along the shoulder seams. On the mirrored panel where the tail ends don’t fall naturally to the inside, do your best to bring those ends to the inside. Leave the bottom tail ends for tassels.
The final step before sewing the garment together is to block the panel pieces. See the video at 23:20 if you are not sure how to do that. This is the end of the Easy Crocheted Sweater Vest ~ Part One. Part Two will soon be available!
Sharing is caring! Click on the social share button at the top of the blog and choose an image from below to share on social media.