To Make Beautiful New Ones!
Beeswax candles have a tendency to end up looking rather dirty and ugly after a while. And if you are like me, I simply can’t throw out this precious gift from nature! I think of how hard the bees worked to make all this wax, so I like to melt them down, clean them up and make new pretty candles. Let me show you how you can do this too!
Some (but perhaps not all) of the links in this blog are affiliate links to Amazon.com. As an Amazon Associate, I earn from qualifying purchases. This page contains some affiliate links. Please see my policy page for details. I look for the best possible option for your convenience, however, I encourage you to support your local shops!
While this is super easy to do, you will need some special equipment and a bit of time. Also, if you don’t have old candles, you can still make these beautiful candles with new beeswax pellets.
Beeswax is impossible to clean from pots and containers, so you will want to dedicate a few old items to your candle making. I will be making more tutorials using beeswax such as natural perfumes and natural skin and body care products, so you can store these items away for next time!
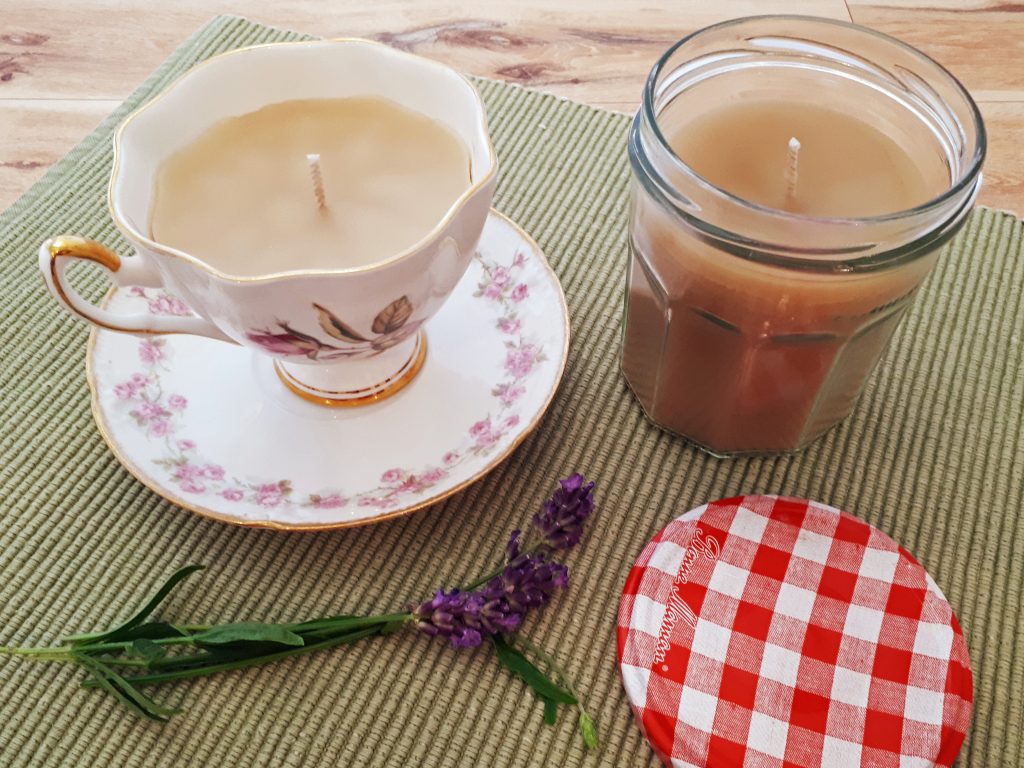
Thrift stores are a great resource for such items, and if you can find them, you will need a double boiler (or a pot for the water and a heatproof glass bowl that will sit on the rim), a glass measuring cup and a spoon or chopstick. I got this miss-matched teacup and saucer from a free box at a local thrift store. The jam jar is so pretty and is perfect for this project.
As far as how much time you will need, this will depend on how big your chunks of beeswax are. It can take quite a while for the wax to completely melt in a double boiler. You may be tempted to use the microwave…don’t! The wax heats from the inside and will explode (not that I have personal experience with this…haha. Ok, maybe I do!) You can use the regular oven to keep your melted wax from going hard, and I’ll refer to that later on.

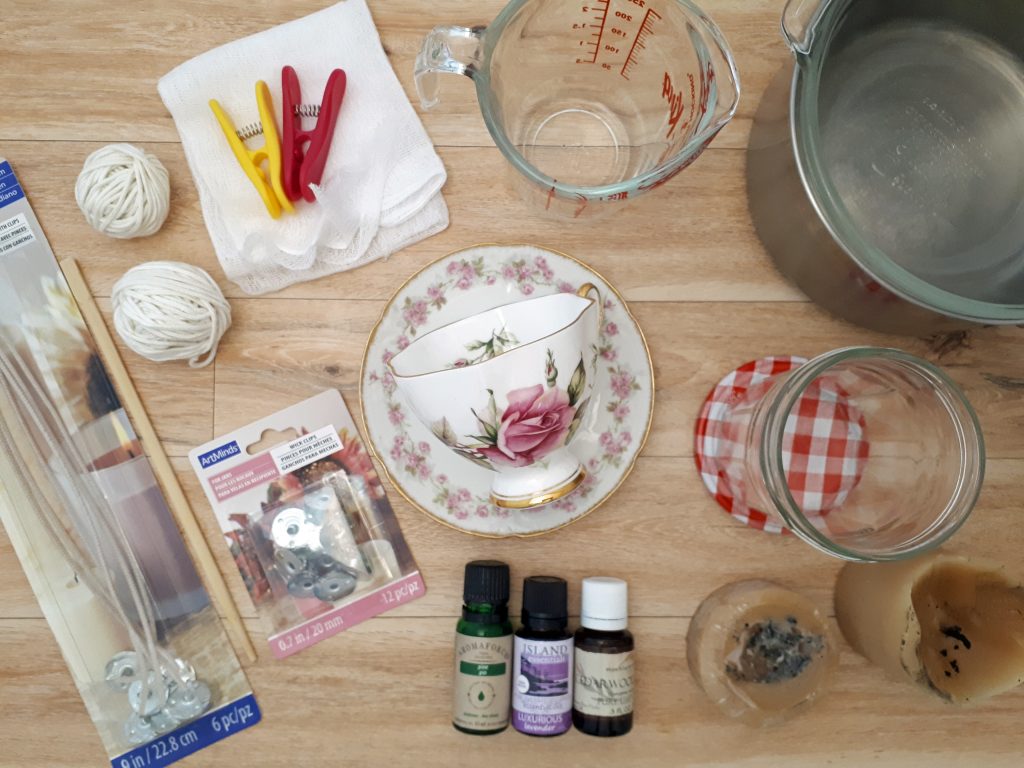
Here is what you will need:
- Double boiler
- Glass measuring cup or bowl
- Spoon or chopsticks
- Old beeswax candles
- Coconut oil
- Wicks (prepared or by the yard)
- Old teacup and/or jam jar
- Cheesecloth and clothespins
- Essential oils (optional)
- A piece of rigid plastic
- Potholders
- Old rags/towels
- Newspaper, brown paper or plastic to protect work surface
- Paper Towels
I will provide the basic recipe and also provide how much I used to make both the teacup candle and jam jar candle. I was very fortunate because the quantity of old wax I had was the perfect amount for both these projects.
Basic Recipe: Yields 2-1/2 cups (550ml) melted wax
- 1 pound (454 grams or 0.454 kilograms) beeswax
- 1/2 cup (125ml) coconut oil
- 30 to 50 drops essential oil (optional)
Teacup and Jam Jar Quantities: Teacup = 2/3 cup (150ml). Jamjar = 1 cup (250ml). Total is 1-2/3 cup (400ml)
- 3/4 pound (350 grams or 0.35 kilograms) beeswax
- 1/3 cup (90ml) coconut oil
- 35 drops essential oil (optional)
Adding essential oils to the candles is an option. You would need a lot of oil for the candles to have a powerful scent, so this can be expensive. I don’t recommend synthetically scented oils as they are very toxic. Also, the coconut oil will have a scent as well, so the layers of fragrance will be quite soft. You can get a nice selection of essential oils from Starwest Botanicals and they also offer organic oils. For these candles I used the following oils:
- Teacup: Lavender-10 drops, Cedarwood-3 drops, Pine-2 drops
- Jam Jar: Lavender-13 drops, Cedarwood-4 drops, Pine-3 drops
Begin by melting the beeswax on the double boiler. This will take some time, so make sure to check the water in the lower pot occasionally.

Prepare your work surface while the wax is melting. Choosing the type of wick to use is important. You can buy prepared wicks or get it by the yard. Some will have a wax coating as well. A finer wick is best for tapered, votive or tea light candles. A thick wick is best suited for pillar and jar candles.
The prepared wicks come set in a base, and the wick has a layer of wax to keep it firm. The wax by the yard will come with wick bases and you will have to thread your wick into that. The wick will be flexible and a little difficult to handle.

For the prepared wicks, I cut a piece of rigid plastic into a strip long enough to lay over my cup and jar and used a hole punch to create a small hole in the top. This works perfectly to hold the wick in the center of the candle once it is poured. If using the wick by the yard, you can wrap the top of the wick around a pencil or chopstick.
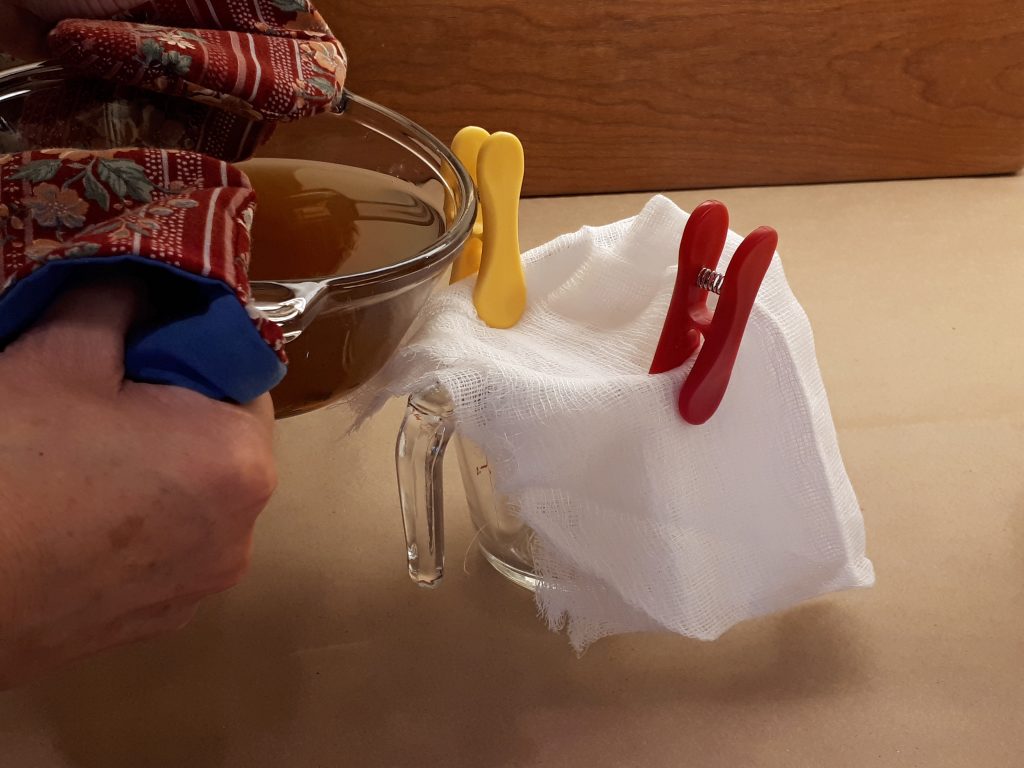
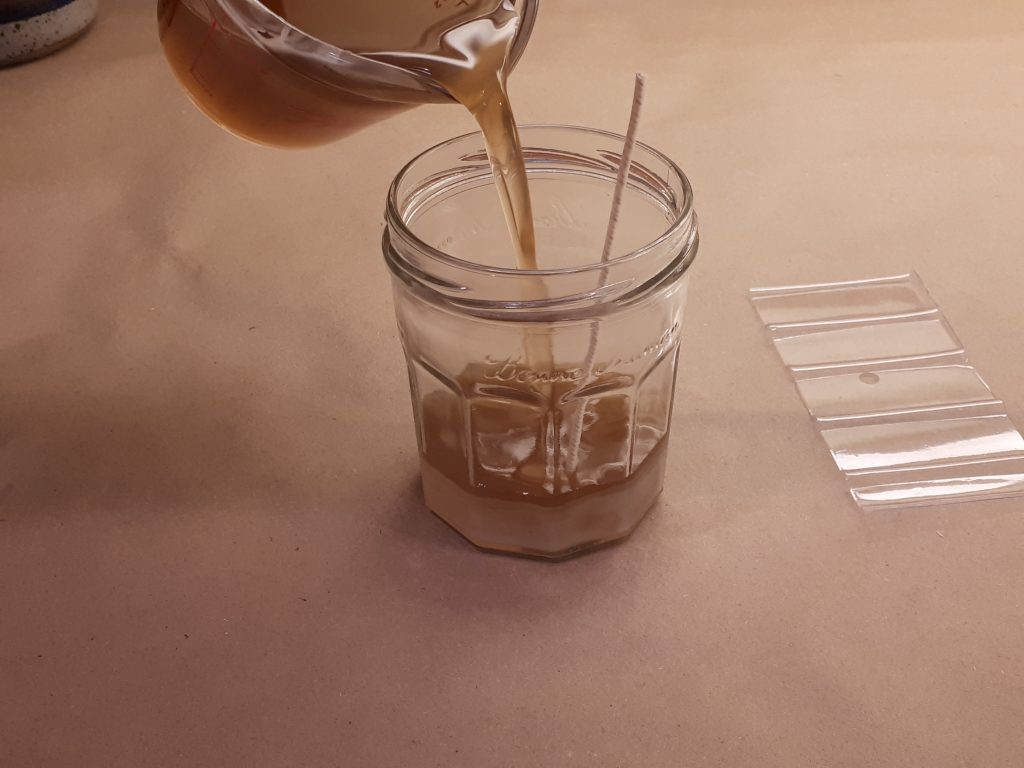
Once the wax has completely melted, you can add the coconut oil and heat until melted. Then you are ready to strain the wax. Place the cheesecloth on top of your glass measuring cup and hold in place with clothespins. Then VERY SLOWLY, pour the wax through the cheesecloth.
Measure 2/3 cup (150ml) for the teacup and place the unused wax back on the double boiler. Add the essential oils and stir in with spoon or chopstick. The wax will begin to set up immediately, so you can either pop it in the microwave for a few seconds or place it in the oven at 200 degrees F (93 degrees C) for a minute or two. Pour the wax into the teacup.
Warning! If the wax hardens to the point where the top has a skim coat on it, DO NOT put it in the microwave! Poke a hole in the top or use the oven. I learned this the hard way and let me tell you…cleaning wax splatters out of the microwave is not easy!
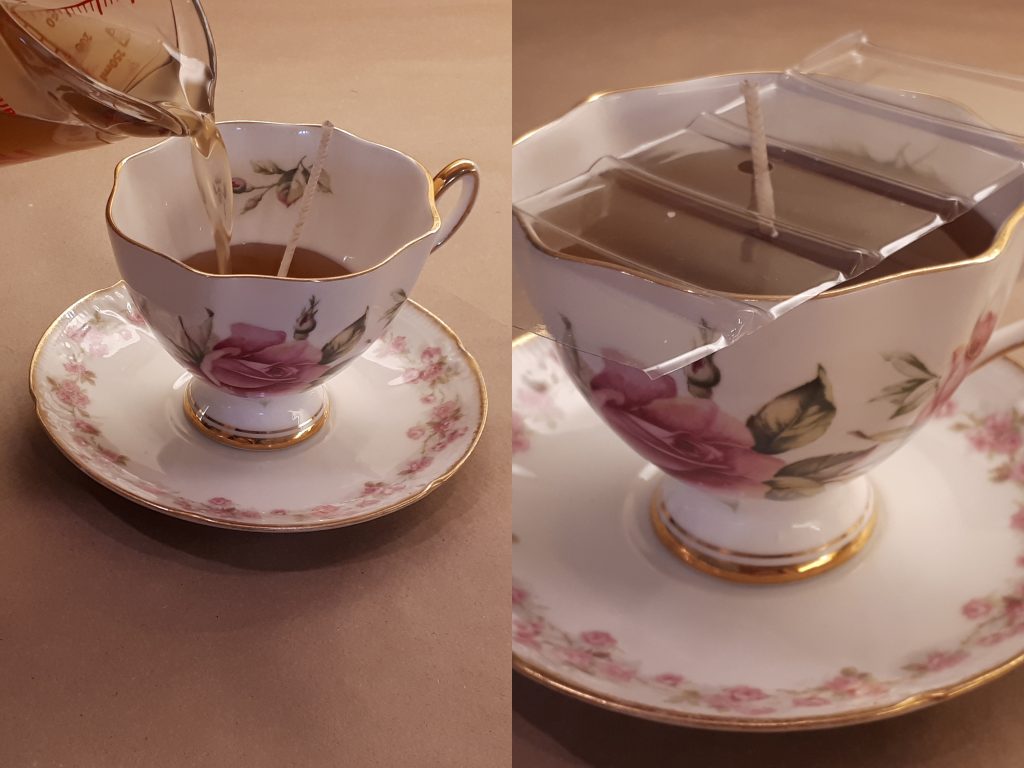
Center your wick and let sit in place until the wax sets. This will create a nice smooth finish on the top of your candle. Repeat the process of straining the wax, adding your oils and pouring the clean wax into your jam jar. Let them sit overnight before trimming the wicks or burning your new candles!
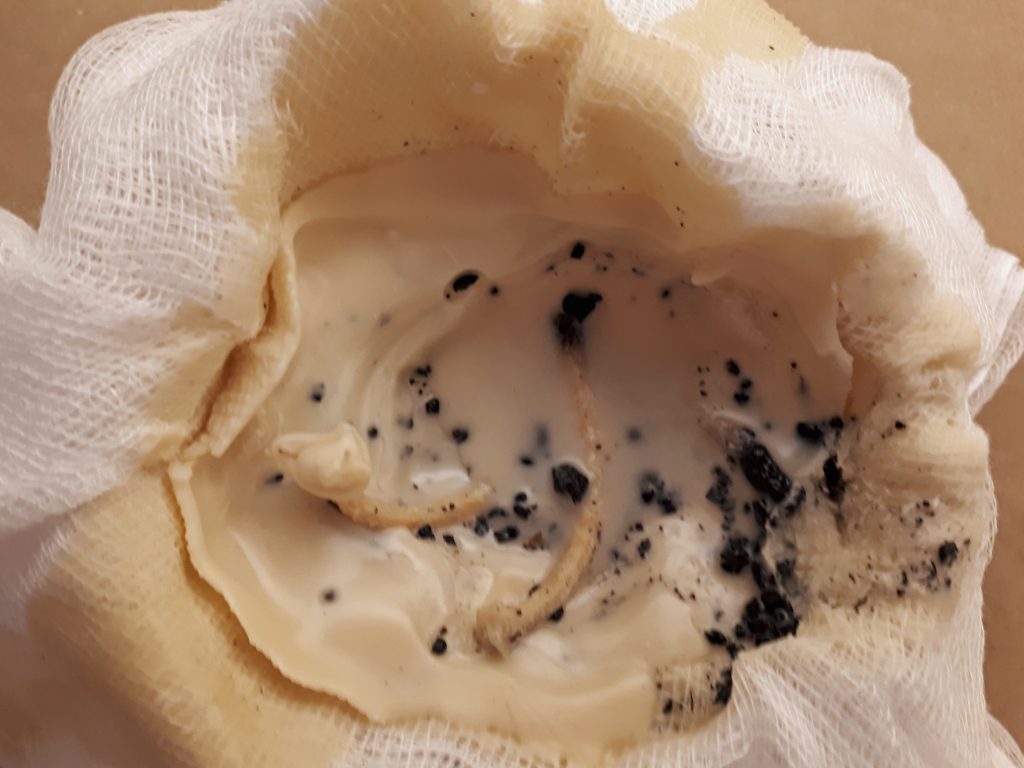
What you have left will look like the image below. Isn’t this a great way to reuse old beeswax candles? Of course, you can do this for all sorts of used candles. I prefer to use either beeswax or soy wax because they are non-toxic.
Beeswax is a very hard wax and burns hot. It actually isn’t the best choice for burning in a container, so this is why coconut oil is added to the blend. It helps to cool the wax down and burn more slowly. Soy wax could be used as well. In that case, I would probably make the blend 50/50. It will take a bit of nurturing to help the candle burn down evenly.
A kit like this can help take care of your candles. Dip the wick in the melted wax to extinguish. This helps keep the wick from splitting. Trim the wick to 1/4″ after it has dried. Use the edge of the wick scissors to push the softened wax from the sides of the container into the melting wax.

Finally, to clean up your wax making supplies, place in a 200 degree F (93 degrees C) oven until the wax is melted (place on a cookie sheet with parchment paper). Carefully wipe the wax from the utensils with paper towels and store away for your next project.
Enjoy your beautiful candles!