Super Easy Pattern!
Join me for this easy and fun crochet project to learn how to crochet a granny square blanket. This tutorial is suited for beginners as the blanket is simply one big granny square, made from a single cake of yarn. It measures 27″ by 27″ (69 cm by 69cm), although you could carry on with another cake of yarn and make the blanket even bigger. This size is perfect for a baby blanket or a lap blanket.
Some (but perhaps not all) of the links in this blog are affiliate links to Amazon.com. As an Amazon Associate, I earn from qualifying purchases. This page contains some affiliate links. Please see my policy page for details. I look for the best possible option for your convenience, however, I encourage you to support your local shops!
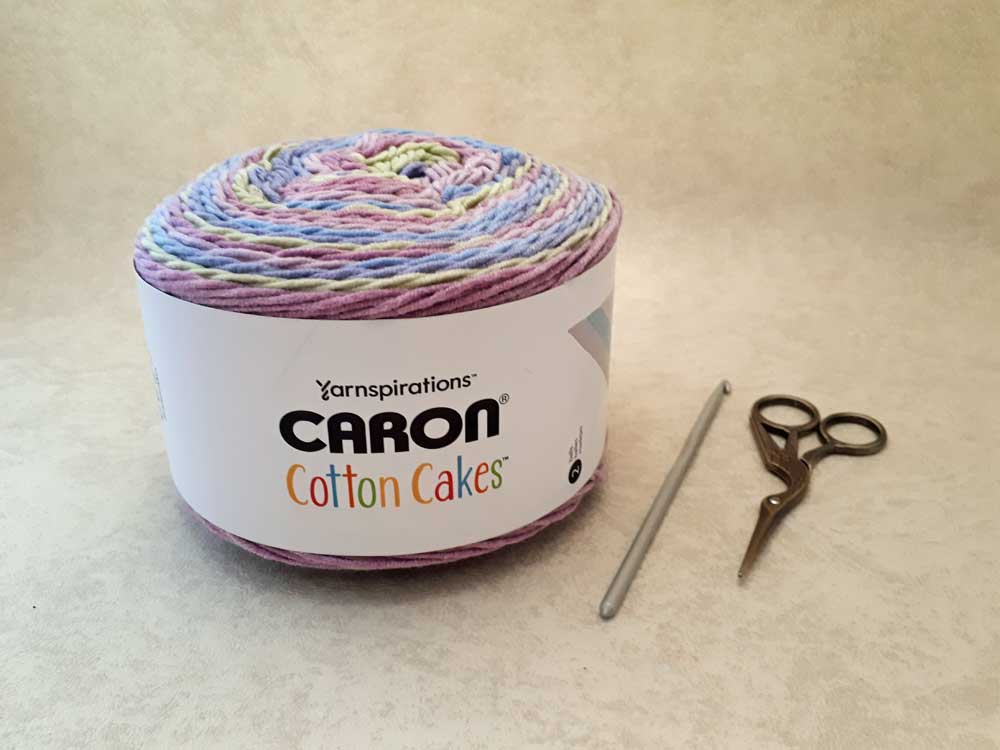
For this project, I am using Caron Cotton Cakes ‘Sunset Dreams’ yarn, but it is no longer available. Here is a different option… Caron Jumbo Ombre Yarn in Baby Rainbow. There is the equivalent of 2 balls of yarn here with a total of 595 yards or 544 meters. This ball is larger than the Cotton Cakes, so the blanket should crochet up a bit larger than the one I show here.
The Cotton Cakes is a number 4 medium worsted weight yarn, 60% cotton, and 40% acrylic. The recommended hook size is US H/8 or 5mm, but I’m using a US 7 or 4.5mm hook because I tend to crochet with very loose tension. The Caron Jumbo Ombre is also a number 4 medium weight yarn, but it is 100% acrylic. The same recommendations for the hook size apply to this yarn too.
If you are new to crochet, make sure to check out my Beginner Crochet Series Blog that has 2 video tutorials to show you everything you need to know to make this pretty blanket! I’ve also created a step by step video tutorial for this pattern, so you can follow along with that if you like! You will find it at the bottom of this post.
To begin, ch 5, join with sl st to first ch to form a ring.
1st rnd: Ch 6, *3 dc in ring, ch3, rep from * 2 times in ring, 2 dc in ring, join with sl st to 3rd ch of ch 6. (Four groups of 3 dc, ch-3 sps in total).
2nd rnd: Sl st in next ch-3 sp, ch
6, 3 dc in same ch-3 sp, *ch 1, (3 dc, ch 3, 3 dc) in next ch-3 sp. Rep from *
twice more, ch 1, 2 dc in first ch-3 sp, join with sl st to 3rd ch of ch 6.
3rd rnd: Sl st in next ch-3 sp, ch 6, 3 dc in same ch-3 sp, *ch 1, 3 dc in next ch-1 sp, ch 1, (3 dc, ch 3, 3 dc) in next ch-3 sp. Rep from * twice more. Ch 1, 2 dc in first ch-3 sp, join with sl st to 3rd ch of ch 6.
4th rnd: Sl st in next ch-3 sp, ch
6, 3 dc in same ch-3 sp, *ch 1, 3 dc in next ch-1 sp, ch 1, 3 dc in next ch-1
sp, ch 1, (3 dc, ch 3, 3 dc) in next ch-3 sp. Rep from * twice more. Ch 1, 2 dc
in first ch-3 sp, join with sl st to 3rd ch of ch 6.
Continue with this same pattern, adding one more dc cluster (3 dc, ch 1) to each side of each consecutive round until all the yarn is used. You could also create a border for the last round by doing a row of double crochet. (see below)
I completed 24 rounds altogether and had enough yarn left to do either one more round with the granny square pattern or do a border with double crochet. I chose to finish my blanket with the double crochet.
Final rnd: Sl st in next ch-3 sp, ch 3, 2 dc in same ch-3 sp, *1 dc in top of next dc. Rep from * to next ch3 sp. *3 dc in ch3 sp, 1 dc in top of next dc’s to next ch3 space. Repeat from * all around, fasten off.
As I came into the second corner, I had completed two sides of the blanket with yellow. I had enough yellow to go about halfway around the third side, but I decided to cut the yarn and join the pink with a magic knot so I would end up with two sides in yellow and two sides in pink. This is totally up to you, but I show you how to do a magic knot in the video tutorial.
Once you have finished making your blanket, darn in the ends. You can “block” the blanket by washing it in a gentle cycle (follow the manufacturer’s recommendations), and then lay it out flat on a towel to dry. Gently shape the blanket with your hands into a nice square shape.
Enjoy your new creation or give it as a gift! Check out the video tutorial below if you want to follow along step by step. And please share this post with your friends!
Update!
I have noticed a common problem with granny square blankets that are worked in continuous rounds, which is that the blanket sometimes becomes warped and wonky. This question comes up often in some of the crochet Facebook groups I’m in, and also from some of my followers. The problem, if this happens, is caused by tight tension. This can be caused by technique, by the type of yarn used, or by both! I created a video tutorial that explains this a bit more and offers an easy solution.
If you like this tutorial, then you may also like:
- Rectangle Granny Square Blanket
- Ferris Wheel Scarf: Part One (the granny square)
- Ferris Wheel Scarf: Part Two (the scarf assembly)